
The Silhouette Blog posted a sketch challenge that I wanted to give a try. The prize is a pink Cameo tote, so how could I resist. Here's a look at the sketch.

and here's my take on it.

Here's what I used for this project
Be Amazing Paper Pad
3 Valentine Tags by Lori Whitlock #15668 from the Silhouette Store
Just click on the photos
Be Amazing Paper Pad
3 Valentine Tags by Lori Whitlock #15668 from the Silhouette Store
Just click on the photos


For all my scrapbook pages I like to use the Silhouette Studio print and cut for my photos. I print my own photos because, I bring them first into Photoshop, adjust the color and I sometimes like to add filters, on these photos I gave them a soft focus. Then I bring them into Silhouette Studio.(**Note the new upgrade of SS tells me my photo resolution is too low, but the photos still come out beautiful) I can shape them any way I want, from square to rectangle or fun shapes like a circle or a sun. In addition while I'm designing the page I can see the photos right on the mat.
Here's a look at my mat for this page.

You can see how much easier it is to plan when you have the photos imported.
Here's how you do it.
1. In the Silhouette Studio Software go to File> open> your image>. ( **all files**located in the drop down menu must be selected in order to see all file types including .jpgs)

Now you have your photo (or digital paper) opened on your mat and it's time to resize it to the final size you want. (For that reason I add my photos when I have most of the design done.) Next, I add the shape that I want to use to my mat. If you want only one part of the design, go ahead and upgroup the shape and grab only the part you want, you can delete the rest or just move them off the mat. Here's a look at my mat at this stage.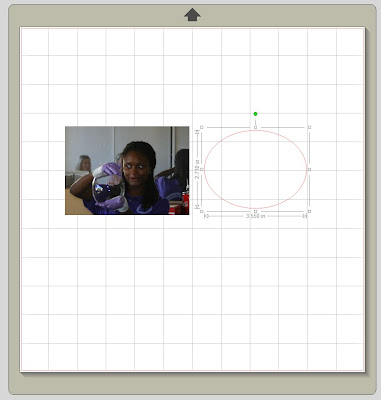

2. Now move the shape over the photo, you can resize either at this stage. When you're done select BOTH the image and the shape and go to Object> Modify> Crop and that is it! You can add as many photos as you want, just repeat the process. Next you follow the steps for a regular print and cut.

Here's the same thing done with the Echo Park Sun journaling shape C00235_48353 and some Websters Pages digi paper.


How cool is that! think of all the custom embellishments we can make!!
That's it.
Have a great day and thanks for stopping by!
Hi there, I have a question if you don't mind! I have not used my SD yet I don't have the cameo but how do you get your photos to show up in the SD, do you change them to something in photoshop so they can be seen in the SD.
ReplyDeleteYou don't have to use photoshop, just open the photos as described in the tutorial. You can open any .jpg which is a typical photo type. Go to file-open-all files- your file name and that's it.
DeleteYou can find the **all files** in the drop down menu I'll post a photo of it.
DeleteLove this page! I'd love to have a tutorial/video of a start to finish for this type of process, i.e. how you set up your cuts, and so forth.
ReplyDeletethanks!
I'm looking into getting some screen recording software. In the meantime Doodlingdebbie on YouTube has some excellent videos.
DeleteHi, I'm really glad I found your blog as I were looking for inspiration to use the Silhouette more for scrapbooking. I have learned a lot just by following your blog the last month. I love the way you put the sketch into the Silhoutte.
ReplyDeleteAfter todays post I have a question. You open your pictures in the program, but can you print and cut at any kind of photo paper ?
Looking forward to follow your blog.
Yes you can use any photo paper. They vary in thickness,so you may have to do a couple of test cuts first. I used a blade setting of 4 and double cut it just to be safe.
DeleteThanks for the instructions on this technique. I don't print and cut, but I like learning the way to do it.
ReplyDeletegroovyvirgochick - the studio software (for the SD or Cameo) is able to open JPG files which are what photos are saved as. When you open files in studio, the default file type that it is looking for is STUDIO, so just change it to "all types" or "JPEG" and your photos will show up to be selected.
Thank you. Debbie is great. I am also a member of her forum! :)
ReplyDeletenow this looks so easy, even I think I can do this! Really love the journaling tag...wow great idea!
ReplyDelete