 s that are available. Whether it's Dusty Attic or grungeboard, I think the most important thing is layering the paints and inks. For example, with the chipboard florishes, I started by painting them blue with acrylic paints (slightly deeper then the paper color). After adding a couple of coats, I went over all the edges with charcoal colored fluid chalk and last a layer of black lava around the edges again. Which really gives the finish a nice depth of color. Sometimes I spray them with a sealer which can be either glossy or matte.
Sunday, June 6, 2010
Finishes for chipboard elements.
Here is a close up of the finished layout. I've been asked more than a few times how to finish all the great laser cut chipboard element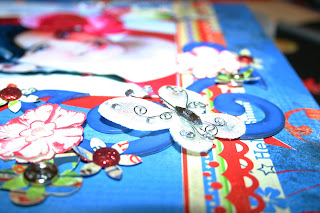 s that are available. Whether it's Dusty Attic or grungeboard, I think the most important thing is layering the paints and inks. For example, with the chipboard florishes, I started by painting them blue with acrylic paints (slightly deeper then the paper color). After adding a couple of coats, I went over all the edges with charcoal colored fluid chalk and last a layer of black lava around the edges again. Which really gives the finish a nice depth of color. Sometimes I spray them with a sealer which can be either glossy or matte.
s that are available. Whether it's Dusty Attic or grungeboard, I think the most important thing is layering the paints and inks. For example, with the chipboard florishes, I started by painting them blue with acrylic paints (slightly deeper then the paper color). After adding a couple of coats, I went over all the edges with charcoal colored fluid chalk and last a layer of black lava around the edges again. Which really gives the finish a nice depth of color. Sometimes I spray them with a sealer which can be either glossy or matte.
Subscribe to:
Post Comments (Atom)
Thanks for the tutorial Lisa!! It had never occured to me to add that many layers to my chipboard pieces but WOW, what a wonderful difference it makes!!
ReplyDeleteLove your new blog, btw! Can't wait to see what you post next :)